How To Setup Okta Single-Sign On With KPA Flex
This guide is for companies who use Okta and would like to set Okta up as the Single Sign-On (SSO) provider for KPA Flex. Please send questions to [email protected]
Step 1. Create the KPA Flex Application
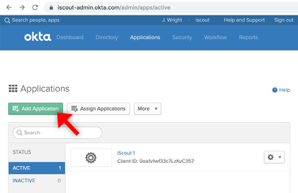
First you need to add KPA Flex to your Okta account as an application. Go to your Applications tab and press “Add Application”:
Then press “Create New App”:
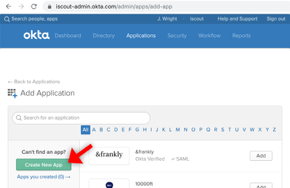
Step 2. Choose the Connection Type
Choose “OpenID Connect” and press Create:

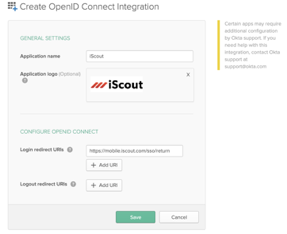
Enter the following settings:
- Application name: KPA Flex (or whatever you prefer)
- Application logo: (download from https://common.kpaehs.com/sso/logo.png)
- Login redirect URIs: https://mobile.kpaehs.com/sso/return
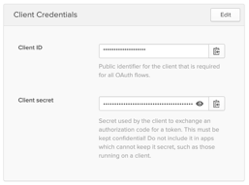
Step 3. Find Your Client Credentials
In Okta, under the “General” tab for the new “KPA Flex” application (the one you just created), you’ll find a “Client Credentials” section. Here you’ll find the Client ID and Client secret:
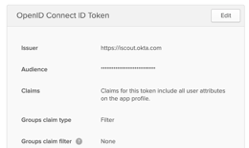
We also need your Okta subdomain. Click on the “Sign On” tab for the KPA Flex application and scroll down to the “OpenID Connect ID Token” section. The “Issuer” field will tell you your subdomain.
In this example, the Issuer is https://iscout.okta.com, so the subdomain is “iscout”.
Step 4. Send Us Your Credentials
This information is sensitive, so find a secure way to send KPA Flex the following information. For example, gmail has a “confidential mode” that would be sufficient.
The info you need to send should have this format:
{
  "authorizationURL": "https://**********.okta.com/oauth2/v1/authorize",
  "tokenURL": "https://**********.okta.com/oauth2/v1/token",
  "clientID": "********************",
  "clientSecret": "****************************************"
}
So, for example, this would be a realistic setup:
{
  "authorizationURL": "https://mycompany.okta.com/oauth2/v1/authorize",
  "tokenURL": "https://mycompany.okta.com/oauth2/v1/token",
  "clientID": "Xa1v1wf33c7LzKvCfake",
  "clientSecret": "xfXinXklT6BSllnLlsij39O8tBd0uItTQKwffake"
}
Once the KPA Flex team receives your credentials, we will enable the SSO button on your login page to begin testing.
Once testing has been complete, we can continue to allow username/password login, or we can remove the username/passwords field and require SSO for your employees.

